|
| caution |
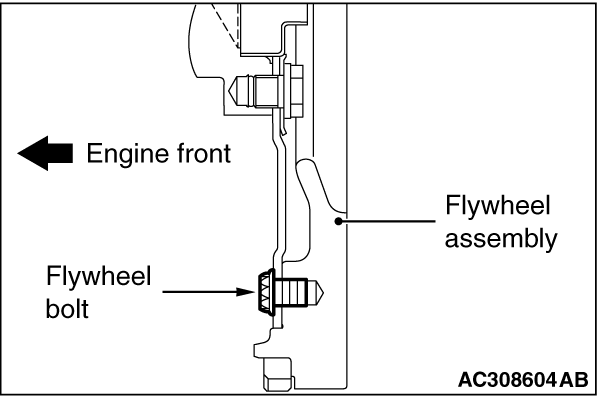
Do not remove the flywheel bolt. If this bolt is removed, the flywheel assembly will become out of balance and damaged.
|
Refer to GROUP 22A, Transmission Assembly  . .
|

|
1.Use special tool flywheel stopper (MD998781) to secure the flywheel assembly <M/T> or drive plate <A/T>.
2.Remove the flywheel bolts <M/T> or drive plate bolts <A/T>.
|
|
|
1.Apply a small amount of engine oil to the entire inner diameter of the oil seal lip.
|

|
2.Use special tool oil seal installer (MB992147) to press-fit the crankshaft rear oil seal.
3.Press-fit the crankshaft rear oil seal into the oil seal case assembly to have the dimension shown in the illustration.
|
|
|
1.Remove completely old sealant remaining on the oil seal case assembly and cylinder block.
|

|
2.Apply a continuous bead of the specified sealant to the oil seal case assembly mating surface as shown.
Specified sealant: MITSUBISHI GENUINE PART MD970389 or equivalent
| note |
Be sure to install the oil seal case assembly quickly while the sealant is wet (within 15 minutes).
|
3.Install the crankshaft rear oil seal into the cylinder block after applying an appropriate amount of engine oil to the entire circumference of its lip portion.
4.Install the oil seal case assembly, and then tighten the mounting bolts to the specified torque.
Tightening torque: 11 ± 1 N·m
| note |
After installation, keep the sealed area away from the oil for approximately one hour.
|
|
|
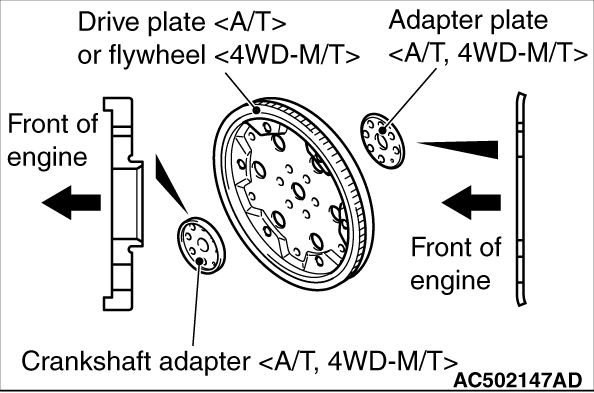
Assemble the crankshaft adapter and the adapter plate to the drive plate or flywheel as shown, and then install the drive plate assembly or flywheel assembly into the crankshaft.
|
|
1.Use special tool flywheel stopper (MD998781) to secure the drive plate <A/T> or flywheel assembly <M/T> in the same manner as removal.
2.Tighten the drive plate bolts <A/T> or flywheel bolts <M/T> to the specified torque.
Tightening torque: 135 ± 5 N·m
|

|
1.Apply a small amount of engine oil to the outer diameter of special tool crankshaft front oil seal guide (MD998383) and install it to the crankshaft.
2.Apply a small amount of engine oil to the entire inner diameter of the oil seal lip.
3.Use special tool crankshaft front oil seal installer (MD998382) to press-fit the crankshaft front oil seal.
|
|
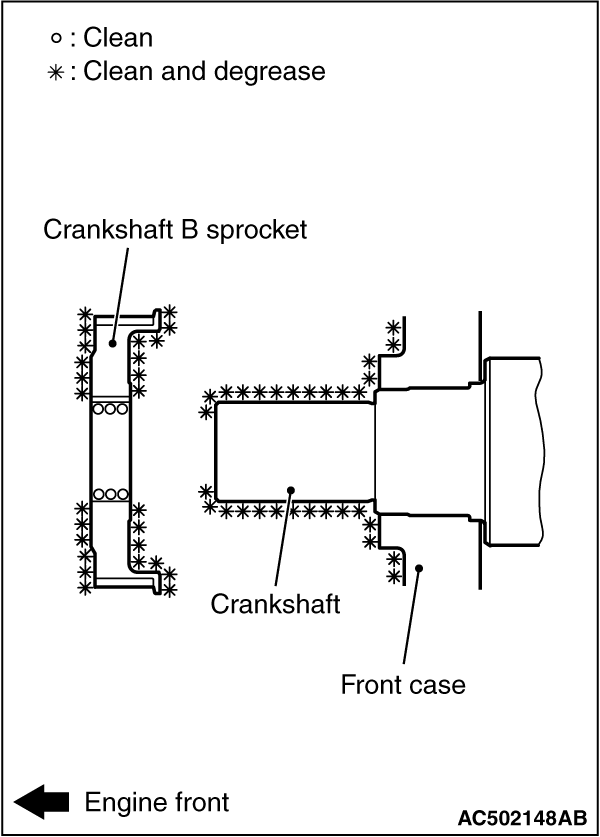
1.Clean or degrease the oil pump case, the crankshaft and the crankshaft B sprocket as shown.
| note |
Also clean the degreased surfaces.
|
2.Install the crankshaft B sprocket in the direction shown in the illustration.
|
)
)
)
)
)
)
)
)