|
|
1.Temporarily install the crankshaft pulley to the crankshaft.
|
|
2.
| caution |
Turn the crankshaft clockwise.
|
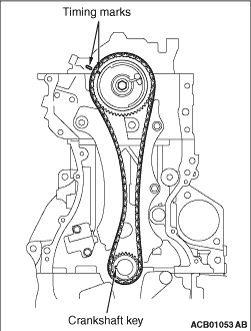
Turn the crankshaft clockwise to align the V.V.T. sprocket timing mark as shown in the
figure and set the cylinder No. 1 to the top dead centre of compression.
| note |
At this time, it is not necessary that the link plate (blue and orange) of the timing
chain always aligns with each sprocket timing mark.
|
3.Check that the crankshaft key is in the position shown in the figure.
4.Remove the crankshaft pulley installed temporarily.
|
|
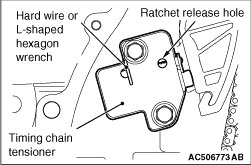
5.Using a precision flat-tipped screwdriver, release the ratchet of timing chain tensioner.
6.Compress the plunger of timing chain tensioner and insert hard wire (such as the piano
wire) or the L-shaped hexagon wrench (1.5 mm) to fix the plunger of the timing chain tensioner.
7.Remove the timing chain tensioner.
|
|
|
For the installation procedure, refer to GROUP 11D - Timing Chain  . .
|
|
|
For the installation procedure, refer to GROUP 11D - Timing Chain .
|
)
)
)