|
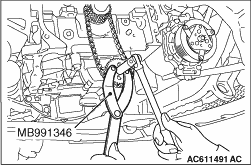
1.Hold the oil pump sprocket with special tool top cover wrench (MB991346).
2.Loosen the oil pump sprocket centre bolt and remove the oil pump chain and oil pump
sprocket.
|
|
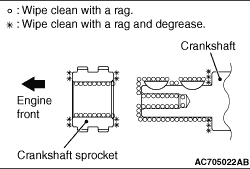
1.Wipe off the dirt off the crankshaft sprocket and crankshaft as shown in the figure using
a rag, and then degrease the areas.
| note |
Degrease to prevent a drop in the coefficient of friction of the pressing portion caused
by adhesion of oil.
|
2.Install the crankshaft sprocket to the crankshaft.
|
|
|
1.Install the oil pump sprocket to the oil pump case.
|
|
|
2.Install the oil pump chain to the crankshaft sprocket.
|
|
|
3.Install the oil pump chain to the oil pump sprocket.
|
|
1.Hold the oil pump sprocket with special tool top cover wrench (MB991346) in the same manner
as removal.
2.Tighten the oil pump sprocket centre bolt to the specified torque.
Tightening torque: 23 ± 2 N·m
|
 ). <4B1>
)
)
)