REMOVAL AND INSTALLATION


Pre-removal operation
  • Engine Coolant Draining (Refer to ).
  • Engine Upper Cover Removal (Refer to GROUP 11A - Camshaft ) <4B1>.
  • Engine Upper Cover Removal (Refer to GROUP 11C - Rocker Cover Assembly ) <4J1>.
  • Air Cleaner Assembly Removal (Refer to GROUP 15 - Air Cleaner ).

Post-installation operation
  • Air Cleaner Assembly Installation (Refer to GROUP 15 - Air Cleaner ).
  • Engine Coolant Refilling (Refer to ).
  • Engine Upper Cover Installation (Refer to GROUP 11A - Camshaft ) <4B1>.
  • Engine Upper Cover Installation (Refer to GROUP 11C - Rocker Cover Assembly ) <4J1>.


Removal steps
<<A>>
>>B<<
1.
Hose clip
<<A>>
>>B<<
2.
Radiator lower hose connection


3.
Water inlet fitting

>>A<<
4.
Thermostat

REMOVAL SERVICE POINT


<<A>> HOSE CLIP/RADIATOR LOWER HOSE DISCONNECTION


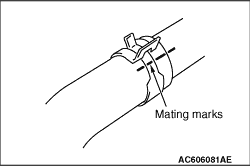
1.Make mating marks on the radiator lower hose and the hose clip as shown to install them in the original position.

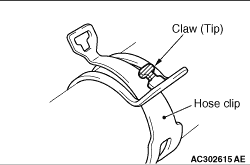
2.Break off the tip of hose clip claw and spread out the hose clip, then disconnect the radiator lower hose.
note If there is a hose clip claw, the hose clip cannot spread to capacity because the claw contacts the hose clip.

INSTALLATION SERVICE POINTS


>>A<< THERMOSTAT INSTALLATION


caution Avoid adhesion of grease to the rubber ring of the thermostat. If the rubber ring is damaged, replace the thermostat.

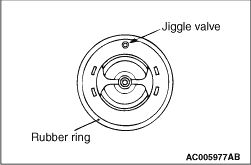
Install the thermostat with care to avoid peeling or damage to the rubber ring. When installing the thermostat, face the jiggle valve of the thermostat upward.

>>B<< RADIATOR LOWER HOSE/HOSE CLIP CONNECTION


1.
caution Never reuse the hose clip whose claw is broken off to prevent the rusting.
Make mating mark on a new hose clip in the same position as the remove one.

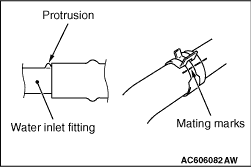
2.Insert the radiator lower hose until the protrusion of the water inlet fitting.
3.Align the mating marks on the radiator lower hose and hose clip.
4.Remove the hose clip claw and shorten the hose clip, then install the radiator lower hose.