REMOVAL AND INSTALLATION <4N1>


Pre-removal Operation
  • Engine Coolant Draining (Refer to ).
  • Engine Upper Cover Removal (Refer to GROUP 13D - Fuel Injector ).
  • Air Cleaner Assembly Removal (Refer to GROUP 15 - Air Cleaner ).
  • Battery and Battery Tray Removal (Refer to GROUP 54A - Battery ).

Post-installation Operation
  • Battery and Battery Tray Installation (Refer to GROUP 54A - Battery ).
  • Air Cleaner Assembly Installation (Refer to GROUP 15 - Air Cleaner ).
  • Engine Upper Cover Installation (Refer to GROUP 13D - Fuel Injector ).
  • Engine Coolant Refilling (Refer to ).


Thermostat case removal steps


1.
Water by-pass hose


2.
Heater hose connection


3.
Control wiring harness clamp
<<A>>
>>G<<
4.
Hose clip
<<A>>
>>G<<
5.
Radiator lower hose connection


6.
A/T fluid cooler water return hose


7.
Inlet fitting water pipe

>>B<<
8.
O-ring


·
Catalytic converter assembly [Refer to GROUP 15 - Exhaust Pipe, Main Muffler and Catalytic Converter <2WD>, <4WD>]


9.
Thermostat housing and water inlet hose fitting


10.
Cooling water inlet fitting


11.
Thermostat case


Cooling water line pipe removal steps


12.
Heater hose connection


·
Variable geometry control solenoid valve, EGR cooler solenoid valve and EGR valve pipe B (Refer to GROUP 15 - Inlet Manifold )


·
EGR valve pipe A (Refer to GROUP 17 - EGR Valve )


13.
Oil cooler water hose


14.
Water hose B connection


15.
Water hose D


·
Throttle body (Refer to GROUP 13D - Throttle Body Assembly )


16.
EGR water pipe


Cooling water by-pass fitting removal steps


1.
Water by-pass hose


16.
EGR water pipe
<<B>>
>>F<<
17.
Engine coolant temperature sensor


18.
Water by-pass hose connection


19.
Water by-pass pipe


20.
Water hose A


21.
Water by-pass fitting

>>E<<
22.
Water by-pass fitting gasket


Cooling water outlet fitting removal steps


·
EGR valve (Refer to GROUP 17 - EGR Valve )
<<C>>
>>D<<
23.
Radiator upper hose connection


24.
Water outlet fitting

>>C<<
25.
Water outlet fitting gasket


Water pump inlet pipe removal steps


·
Water pump (Refer to )


26.
Water inlet pipe

>>B<<
27.
O-ring

>>A<<
28.
Gasket

REMOVAL SERVICE POINTS


<<A>> HOSE CLIP/RADIATOR LOWER HOSE DISCONNECTION


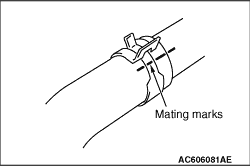
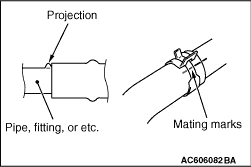
1.Make mating marks on the radiator lower hose and the hose clip as shown to install them in the original position.

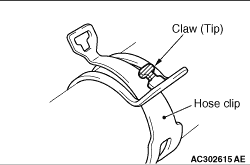
2.Break off the tip of hose clip claw and spread out the hose clip, then disconnect the radiator lower hose.
note If there is a hose clip claw, the hose clip cannot spread to capacity because the claw contacts the hose clip.

<<B>> ENGINE COOLANT TEMPERATURE SENSOR REMOVAL


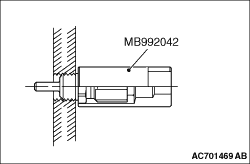
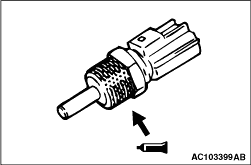
Use special tool water temperature sensor wrench (MB992042) to remove the engine coolant temperature sensor.

<<C>> RADIATOR UPPER HOSE DISCONNECTION


Make mating marks on the radiator hose and the hose clamp. Disconnect the radiator hose.

INSTALLATION SERVICE POINTS


>>A<< GASKET INSTALLATION


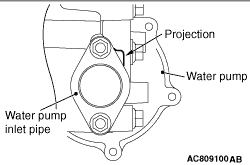
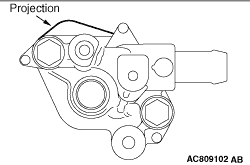
Install the water pump inlet pipe gasket as its projection is in the direction shown.

>>B<< O-RING INSTALLATION


caution Avoid adhesion of engine oil or grease to the O-ring.

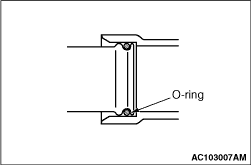
Fit the O-ring in the pipe groove, wet the O-ring circumference or the pipe mounting area inner wall, and then insert the O-ring.

>>C<< WATER OUTLET FITTING GASKET INSTALLATION


Install the water outlet fitting gasket as its projection is in the direction shown.

>>D<< RADIATOR UPPER HOSE CONNECTION


1.If the radiator hose or the hose clip is replaced, mark their locations to aid correct reinstallation later.

2.Insert radiator hose as far as the projection of the water outlet fitting.
3.Align the mating marks on the radiator hose and hose clamp, and then connect the radiator hose.

>>E<< WATER BY-PASS FITTING GASKET INSTALLATION


Install the water by-pass fitting gasket as its projection is in the direction shown.

>>F<< ENGINE COOLANT TEMPERATURE SENSOR INSTALLATION


1.Apply the sealant to the thread of engine coolant temperature sensor.
Specified sealant: ThreeBond 1324N or equivalent
note Install the engine coolant temperature sensor immediately after applying sealant.

2.
caution After the installation, until a sufficient period of time (one hour or more) elapses, do not apply the oil or water to the sealant application area or start the engine.
In the same manner as for removal, using special tool water temperature sensor wrench (MB992042), tighten to the specified torque.
Tightening torque: 30 ± 9 N·m

>>G<< RADIATOR LOWER HOSE/HOSE CLIP CONNECTION


1.
caution Never reuse the hose clip whose claw is broken off to prevent the rusting.
Make mating mark on a new hose clip in the same position as the remove one.

2.Insert the radiator hose as far as the projection of the inlet fitting water pipe.
3.Align the mating marks on the radiator hose and hose clip.
4.Remove the hose clip claw and shorten the hose clip, then install the radiator hose.