REMOVAL AND INSTALLATION <4B1, 4J1>


caution Do not reuse the oxygen sensor that has been dropped.

<2WD>


Removal steps


1.
Main muffler


2.
Gasket


3.
Exhaust centre pipe


4.
Seal ring


·
Floor console side cover (Refer to GROUP 52A - Front Floor Console Assembly ).


·
Turn up the passenger’s side floor carpet <LH drive vehicles>


·
Turn up the driver’s side floor carpet <RH drive vehicles>


5.
Oxygen sensor (rear) connector
<<A>>
>>B<<
6.
Oxygen sensor (rear)


7.
Exhaust front pipe


8.
Seal ring


9.
Dash panel heat protector
<<B>>
>>A<<
10.
Rivet


11.
Front floor panel front heat protector


·
Rear floor under cover (Refer to GROUP 51 - Under Cover ).
<<B>>
>>A<<
12.
Rivet


13.
Front floor panel rear heat protector

<4WD>


Removal steps


1.
Main muffler


2.
Gasket


3.
Exhaust centre pipe


4.
Seal ring


·
Floor console side cover (Refer to GROUP 52A - Front Floor Console Assembly ).


·
Turn up the passenger’s side floor carpet <LH drive vehicles>


·
Turn up the driver’s side floor carpet <RH drive vehicles>


5.
Oxygen sensor (rear) connector
<<A>>
>>B<<
6.
Oxygen sensor (rear)


7.
Exhaust front pipe


8.
Seal ring


9.
Dash panel heat protector
<<B>>
>>A<<
10.
Rivet


11.
Front floor panel front heat protector


·
Rear floor under cover (Refer to GROUP 51 - Under Cover ).
<<B>>
>>A<<
12.
Rivet


13.
Front floor panel rear heat protector

REMOVAL SERVICE POINTS


<<A>> OXYGEN SENSOR REMOVAL


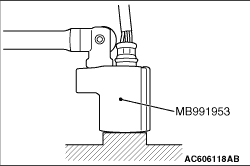
Use special tool oxygen sensor wrench (MB991953) to remove the oxygen sensor.

<<B>> RIVET REMOVAL


caution Be careful not to damage the heat protector with the drill.

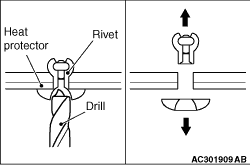
Use a drill (6.0 mm) to make a hole in the rivet to break it, and then remove the rivet.

INSTALLATION SERVICE POINTS


>>A<< RIVET INSTALLATION


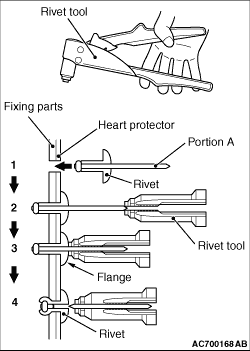
Use a rivet tool shown in the illustration to connect the parts with rivets by the following procedures.
1.Insert the rivet into a corresponding location.
2.Set the rivet tool at a portion A of rivet.
3.While pushing the flange surface of the rivet onto parts to be fixed with the rivet tool, press the handle of the tool.
4.Thin part of portion A of the rivet will be cut off and the parts is fixed in position.

>>B<< OXYGEN SENSOR INSTALLATION


In the same manner as removal, use special tool oxygen sensor wrench (MB991953) to tighten the oxygen sensor to the specified torque.
Tightening torque: 44 ± 5 N·m