|
|
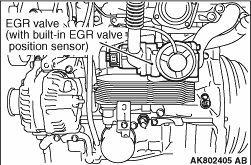
1.Start the engine and warm up. Allow the engine coolant temperature to reach above
70°C.
|
|
2.Turn the ignition switch to "LOCK" (OFF) position. Confirm that the operating noise of
the EGR valve, such as the clicking noise, can be heard three times when the engine is stopped.
3.If the operating noise cannot be heard, check the driving circuit of the DC motor.
| note |
If the operating noise cannot be heard although the circuit is normal, There can possibly
be something wrong with the EGR valve.
|
|
|
|
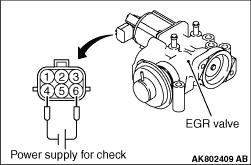
1.Prepare the power supply (5 -
9 V) for the check.
|
|
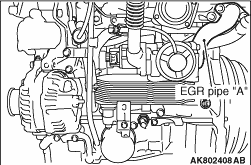
2.Remove the EGR pipe "A".
3.Disconnect the EGR valve connector.
|
|
4.
| caution |
At this time, the power supply voltage is to be 5 V.
For each voltage, current is to be applied within 5 seconds. Once the valve is opened, the voltage
is not to be increased any more. The supply voltage to the motor must be a maximum of 9 V.
|
Connect the terminal No. 6 of the EGR valve connector with the positive terminal of the
power supply of the check (5 V). Connect the terminal No. 4 of the EGR valve connector with the
negative terminal of the power supply of the check.
5.Apply the power supply of 5 V to the EGR valve. Confirm that the EGR valve is opened.
If the valve is not opened, increase the voltage of the power supply for the check by 1 V each
time.
| note |
If the EGR valve is not opened although the voltage applied to the motor is increased
to 9 V, clean the EGR valve and carry out the operation check again. Despite this, replace the
EGR valve if it does not operate.
|
6.Install the EGR pipe "A" (Refer to  ). ).
|
|
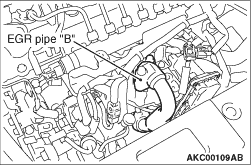
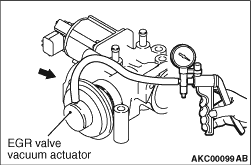
1.Remove the EGR pipe "B".
|
|
2.Connect the hand vacuum pump with the nipple of the vacuum actuator of the EGR valve.
3.Gradually applying the vacuum pressure, confirm through the hole produced by removing
the EGR pipe "B" that the bypass valve shaft is normally operated. When the vacuum pressure
reaches 70 kPa, confirm that the vacuum pressure is maintained.
4.If the bypass valve shaft is not operated, replace the EGR valve.
5.Install the EGR pipe "B" (Refer to GROUP 15 -
Inlet Manifold -
Removal
and Installation <4N1>).
|
|
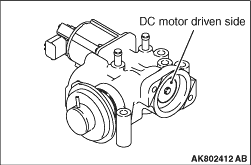
2.Confirm that there is not the carbon stuck or accumulated on the EGR valve (at the DC
motor driven side). If the carbon is stuck or accumulated on the valve (at the DC motor driven side),
use the wire brush and so on to clean the valve.
3.Install the EGR valve (Refer to ).
|
)
)
)
)
)
)