|
|
1.
| caution |
Pay attention to keep from getting burned by hot door panel
or tapes.
|
Use a hair drier to warm the tape.
|
|
|
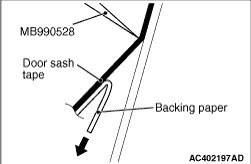
2.Peel the tip of the tape with your finger, and then peel off the tape in parallel
with the application surface.
|

|
1.
| caution |
- The ambient temperature should be 20
to 30°C. Ensure that the working area is clean. Ideally, the tape application should
be done at ambient temperature of 25°C.
- If ambient temperature is less than 15°C, heat the tape and application
surface to a temperature of 20 to 30°C. Alternatively, allow it to cool if it is 35°C
or more. The adhesive property of the tape is deteriorated at low temperature, so the tape may
come adrift easily. Meanwhile, the tape will be softened excessively at high temperature.
- When beginning to apply the tape, pay particular attention. If the end of the tape
cannot be applied to the specified position with an accuracy of less than 1 mm, it may cause
the poor appearance or adhesion.
- Use the special tool MB990528 to apply the tape with a steady pace and pressure. If you
do not apply the tape with a steady pace or pressure, or abort the application, a shallow groove
(lateral groove called as "Shock line") may be present on the tape surface. Meanwhile, if you apply
it too quickly, air bubbles may be formed under the tape.
|
Wrap a soft cloth (synthetic fibre) around the tip of the special tool.
2.Use Parts Cleaner (MZ100387 or equivalent) to degrease the tape application surface.
3.Wipe away dirt from the tape.
|
|
4.Apply the door sash tape according to the procedure below.
(1)
Position the tape at the upper and lower locating points.
(2)
Peel of backing strip from the top of the tape and attach it temporarily.
(3)
Peel off the backing strip to the half length of the tape.
(4)
Apply the tape using the special tool while peeling off the remaining backing strip.
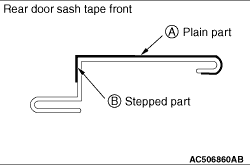
(5)
For the front rear door sash tape, apply it to plain surface (A). Then apply it to stepped
surface (B).
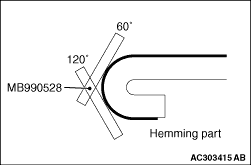
(6)
Press the folded area of the tape by three stages (60 degrees, 120 degrees, and holding),
rolling in toward the vehicle inside direction.
|
 ).
).)
)
)
)
)
)