|
1.
| caution |
When discarding the seat belt with pre-tensioner, discard after
operating the seat belt pre-tensioner as specified in the service procedure (Refer to  ). ).
|
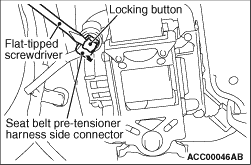
Use the flat-tipped screwdriver to pull out the locking button of wiring harness side
connector, and release the lock.
|
|
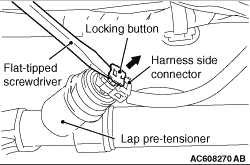
2.Use the flat-tipped screwdriver to pull out the locking button of wiring harness side
connector, and release the lock <Vehicles with lap pre-tensioner>.
|
|
|
1.Check the seat belt pre-tensioner before installation (Refer to ).
| note |
Even when installing a new seat belt with pre-tensioner, perform an inspection before
the installation.
|
|
|
|
2.Connect the negative battery terminal.
|
|
|
3.
| caution |
Be sure to turn the ignition key to the LOCK (OFF) position when
connecting or disconnecting M.U.T.-III.
|
Connect M.U.T.-III to the diagnosis connector (16 pin).
|
|
|
4.Turn the ignition switch to the ON position.
|
|
|
5.Read the diagnosis code, and check that everything is normal except the pre-tensioner
open circuit.
|
|
|
6.Turn the ignition switch to the LOCK (OFF) position.
|
|
|
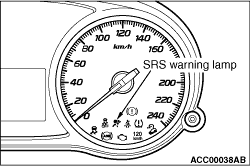
1.Turn the ignition switch to the "ON" position.
|
|
2.Check that the SRS warning lamp is illuminated for 6 to 8 seconds, and extinguished afterward.
3.If the lamp does not extinguish, perform the troubleshooting (Refer to ).
4.Check the seat belt operation. If the seat belt cannot be draw out, replace with a
new seat belt with pre-tensioner.
|
)
)
)
)
)