|
|
If the audio sound is not output, the multivision display may have a problem. In addition, if any of the speakers, tweeters or subwoofer is short-circuited, the protection circuit inside the multivision display disables all the speakers, tweeters or subwoofer to sound. Therefore, if all the speakers do not output sound, the speaker, tweeter or subwoofer circuit may be shorted or the speaker, tweeter, subwoofer or audio amplifier may be defective.
|
|
|
- Malfunction of multivision display
- Malfunctions of speaker, tweeter or subwoofer
- Malfunction of audio amplifier
- Damaged harness wires and connectors
|
|
|
Perform the audio speaker test, and check which speaker, tweeter or subwoofer does not output the sound. Refer to  . .
|
|
|
Q.
Is the check result normal?
|
|
|
YES : The trouble can be an intermittent malfunction (Refer to GROUP 00 -
How to use Troubleshooting/inspection Service Points -
How to Cope with Intermittent Malfunction ).
|
|
|
|
|
|
NO (No speaker, tweeter and subwoofer sound.) : Go to Step 2. : Go to Step 2.
|
|
|
|
|
|
NO (No sound is heard from one of the speaker, tweeter and subwoofer.) : Go to Step 5.
|
|
|
|
|
|
(1)Remove the speaker, tweeter or subwoofer.
|
|
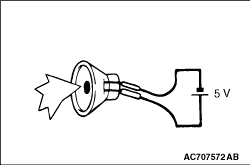
(2)Check that the speaker, tweeter or subwoofer outputs the noise when the voltage of 5 V is applied to the speaker, tweeter or subwoofer connector terminal.
Q.
Do the speaker output the noise?
 Go to Step 3. Go to Step 3.
 Replace the speaker, tweeter or subwoofer. Replace the speaker, tweeter or subwoofer.
|
|
|
- Check of short circuit in DFR+, DFR- line between front door speaker (RH) connector and audio amplifier connector. <Front door speaker (RH)>
- Check of short circuit in DFL+, DFL- line between front door speaker (LH) connector and audio amplifier connector. <Front door speaker (LH)>
- Check of short circuit in TFR+, TFR- line between tweeter (RH) connector and audio amplifier connector. <Tweeter (RH)>
- Check of short circuit in TFL+, TFL- line between tweeter (LH) connector and audio amplifier connector. <Tweeter (LH)>
- Check of short circuit in RR+, RR- line between rear door speaker (RH) connector and audio amplifier connector. <Rear door speaker (RH)>
- Check of short circuit in RL+, RL- line between rear door speaker (LH) connector and audio amplifier connector. <Rear door speaker (LH)>
- Check of short circuit in RW+, RW1+, RW-, RW1- line between subwoofer connector and audio amplifier connector. <subwoofer>
|
|
|
Q.
Is the check result normal?
|
|
|
Repair the connector(s) or wiring harness.
|
|
|
|
|
|
Q.
Is the check result normal?
|
|
|
Repair the connector(s) or wiring harness.
|
|
|
|
|
|
Follow the speaker test to check which speaker, tweeter or subwoofer does not sound.
|
|
|
(1)Remove the speaker, tweeter or subwoofer.
|
|
(2)Check that the speaker, tweeter or subwoofer outputs the noise when the voltage of 5 V is applied to the speaker, tweeter or subwoofer connector terminal.
Q.
Do the speaker output the noise?
Go to Step 6.
Replace the speaker, tweeter or subwoofer.
|
|
|
Follow the speaker test to check which speaker, tweeter or subwoofer circuit is defective.
|
|
|
- Check of open circuit in DFR+, DFR- line between front door speaker (RH) connector and audio amplifier connector. <Front door speaker (RH)>
- Check of open circuit in DFL+, DFL- line between front door speaker (LH) connector and audio amplifier connector. <Front door speaker (LH)>
- Check of open circuit in TFR+, TFR- line between tweeter (RH) connector and audio amplifier connector. <Tweeter (RH)>
- Check of open circuit in TFL+, TFL- line between tweeter (LH) connector and audio amplifier connector. <Tweeter (LH)>
- Check of open circuit in RR+, RR- line between rear door speaker (RH) connector and audio amplifier connector. <Rear door speaker (RH)>
- Check of open circuit in RL+, RL- line between rear door speaker (LH) connector and audio amplifier connector. <Rear door speaker (LH)>
- Check of open circuit in RW+, RW1+, RW-, RW1- line between subwoofer connector and audio amplifier connector. <subwoofer>
|
|
|
Q.
Is the check result normal?
|
|
|
Repair the connector(s) or wiring harness.
|
|
|
|
|
|
Q.
Is the check result normal?
|
|
|
Repair the connector(s) or wiring harness.
|
|
|
|
|
|
Check if the sound is output from all the speaker, tweeter or subwoofer.
|
|
|
Q.
Is the check result normal?
|
|
|
The trouble can be an intermittent malfunction (Refer to GROUP 00 -
How to use Troubleshooting/inspection Service Points -
How to Cope with Intermittent Malfunction ).
|
|
|
|
|
|
Replace the multivision display.
|
|
|
|
)