Pre-removal operation
- Discharging refrigerant (Refer to
 ) )
- Engine room under cover front B and engine room side cover removal (Refer to GROUP
51, Under cover ).
- Drive belt removal (Refer to GROUP 11A, Crankshaft Pulley ) <4B1>
- Drive belt removal (Refer to GROUP 11C Crankshaft Pulley ) <4J1>
- Drive belt removal (Refer to GROUP 11E, Crankshaft Pulley ) <4N1>
- Alternator and others belt removal (Refer to GROUP 11A, Crankshaft Pulley ) <4B1>
- Alternator and others belt removal (Refer to GROUP 11C, Crankshaft Pulley ) <4J1>
- Alternator and others belt removal (Refer to GROUP 11E, Crankshaft Pulley ) <4N1>
|
Post-installation Operation
- Alternator and others belt installation (Refer to GROUP 11A, Crankshaft Pulley ) <4B1>
- Alternator and others belt installation (Refer to GROUP 11C Crankshaft Pulley ) <4J1>
- Alternator and others belt installation (Refer to GROUP 11E, Crankshaft Pulley ) <4N1>
- Drive belt installation (Refer to GROUP 11A, Drive Belt ) <4B1>
- Drive belt installation (Refer to GROUP 11C, Drive Belt ) <4J1>
- Drive belt installation (Refer to GROUP 11E, Drive Belt ) <4N1>
- Alternator drive belt tension check and adjustment (Refer to GROUP 11A, Drive Belt
tension Check ). <4B1>
- Alternator drive belt tension check and adjustment (Refer to GROUP 11C Drive Belt
tension Check ). <4J1>
- Alternator drive belt tension check and adjustment (Refer to GROUP 11E, Drive Belt
tension Check ). <4N1>
- Engine room under cover front B and engine room side cover installation (Refer to
GROUP 51, Under Cover ).
- Charging refrigerant (Refer to )
|
|
|
Plug the hose nipple removed to prevent the entry of dust and dirt.
|
|
|
Be careful not to spill the A/C compressor oil and remove the A/C compressor.
|
|
|
If a new compressor is installed, first adjust the amount of oil according to the procedures
described below, and then install the compressor.
|
|
|
1.Measure the amount X mL of oil within the removed compressor.
|
|
|
2.Drain (from the new compressor) the amount of oil calculated according to the following
formula, and then install the new compressor.
New compressor oil amount = 70mL
|
|
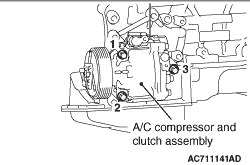
3.Tighten A/C compressor assembly mounting bolts to the specified torque in the
order of number shown in the figure.
Tightening torque: 23 ± 6 N·m
|
)
)