|
|
1.Pull 3 pin connector off oil level / oil temperature sensor.
|
|
|
2.Remove connecting bolts for sump and gearbox.
|
|
|
3.Install sump bolts using commercial item.
|
|
|
4.Remove sump. Loosen sump with light blows of a rubber headed hammer if necessary.
|
|
|
5.Remove sealant residue on cylinder block with a flat scraper.
|

|
6.Remove sealant residue on oil sump with a rotating brush, e.g. a hand drill with a plastic
brush (wear protective glasses).
7.Clean sealing surfaces. They must be free of oil and grease.
|
|
|
1.Remove chain tensioner and tensioning rail.
|
|
|
2.When removing Chain, remove oil pump sprocket at the same time.
|
|
|
Install oil pump to cylinder block.
|
|
|
Install suction line to oil pump.
|
|
|
Install chain tensioner with tensionning rail to cylinder block.
|
|
|
Apply sealant to sealing flange, and then install sealing flange to cylinder block.
|
|
|
Specified sealant: Mitsubishi Genuine Part No.MD970389
|
|
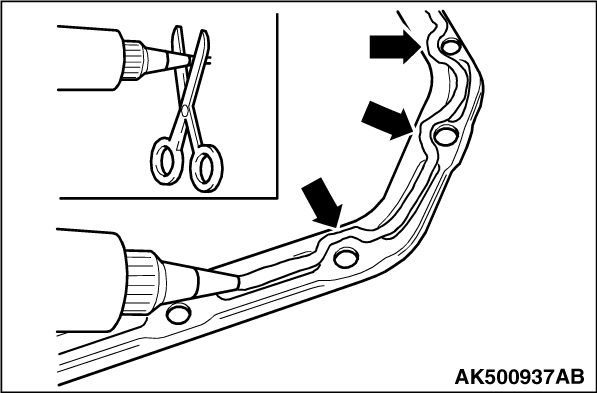
1.Cut off tube nozzle at forward marking (approx. 3 mm diameter of nozzle).
2.Apply silicone sealing compound, as shown, to clean sealing surface on oil sump.
Sealing compound bead must be:
- 2 to 3 mm thick.
- Run bead along inner side of bolt holes "arrows."
Specified sealant: Mitsubishi Genuine Part No.MD970389
| note |
- The sealing compound bead must not be thicker, otherwise excess sealing compound
will enter the oil sump and may block the oil suction line strainer.
- If gearbox is removed, sump must align smoothly with cylinder.
- If gearbox is installed, sump must rest against gearbox.
|
3.Install oil sump immediately and tighten all sump bolts lightly.
4.Tighten connecting bolts for sump and gearbox hand tight.
5.Tighten oil sump bolts to specified torque of 15 N·m.
6.Tighten sump / gearbox bolts to the specified torque of 40 N·m.
|
)

)
)