|
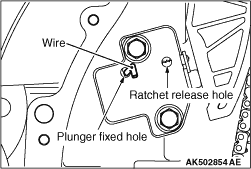
1.Insert a flatblade screwdriver into the release hole of the timing chain tensioner to
release the latch.
2.Push the tensioner lever by hand and push in the plunger of the timing chain tensioner
until it hits the bottom. Then, insert a hard wire (piano wire or the like) of Φ1.5
or hexagonal bar wrench (1.5 mm) into the fixing hole of the plunger.
3.Remove the timing chain tensioner.
|

|
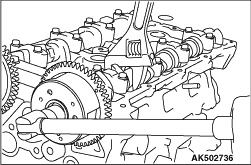
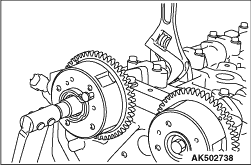
Hold the hexagonal portion of the exhaust camshaft with a wrench and loosen the exhaust
V.V.T. sprocket bolt.
|
|
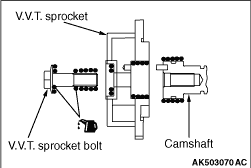
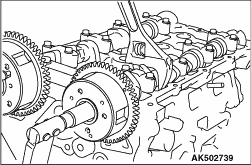
Hold the hexagonal portion of the intake camshaft with a wrench and loosen the intake
V.V.T. sprocket bolt.
|
|
1.Assemble the intake V.V.T. sprocket assembly in the following procedure.
- Make sure that the knock pin of the inlet camshaft assembly is
positioned facing straight upward.
- Apply an appropriate and minimum amount of engine oil to the circumference of the
tip of the intake V.V.T. sprocket assembly and the entire circumference of the area into which
the intake V.V.T. sprocket assembly is inserted.
- Slowly insert the intake V.V.T. sprocket assembly into the normal position of the
inlet camshaft assembly with its knock pin hole facing straight upward.
2.Install the V.V.T. sprocket.
3.Make sure that the V.V.T. sprocket is securely inserted into the bottom and that the
V.V.T. sprocket does not rotate with the hexagonal portion of the camshaft secured with a wrench.
|
|
4.Hold the hexagonal portion of the camshaft with a wrench and tighten the intake V.V.T.
sprocket bolt to the specified torque of 59 ± 5 N·m.
|
|
|
1.Assemble the exhaust V.V.T. sprocket assembly in the following procedure.
- Make sure that the knock pin of the exhaust camshaft assembly
is positioned facing straight upward.
- Apply an appropriate and minimum amount of engine oil to the circumference of the
tip of the exhaust V.V.T. sprocket assembly and the entire circumference of the area into which
the exhaust V.V.T. sprocket assembly is inserted.
- Slowly insert the exhaust V.V.T. sprocket assembly into the normal position of the
exhaust camshaft assembly with its knock pin hole facing straight upward.
|
|
|
2.Install the V.V.T. sprocket.
|
|
|
3.Make sure that the V.V.T. sprocket is securely inserted into the bottom and that the
V.V.T. sprocket does not rotate with the hexagonal portion of the camshaft secured with a wrench.
|
|
4.Hold the hexagonal portion of the camshaft with a wrench and tighten the camshaft sprocket
bolt to the specified torque of 59 ± 5 N·m.
|
|
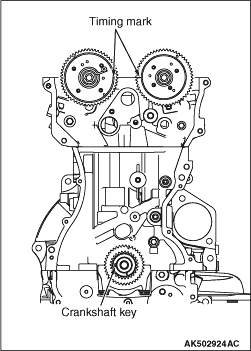
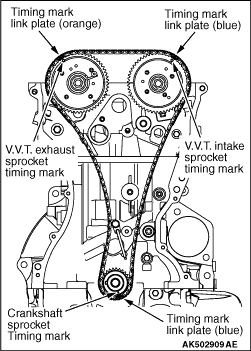
1.Align the timing mark of the V.V.T. sprocket.
2.Align the crankshaft sprocket keys with illustrated positions.
|
|
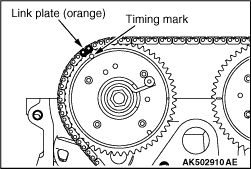
3.Align the link plate (orange) with the timing mark of the exhaust V.V.T. sprocket and
loop the timing chain.
|
|
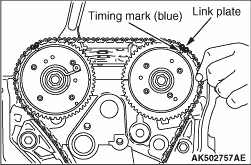
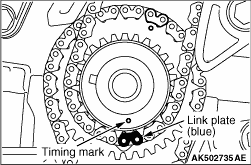
4.Align the link plate (blue) with the timing mark of the intake V.V.T. sprocket to loop
the timing chain.
Rotate the intake V.V.T. sprocket by one or two teeth to align with the timing mark.
|
|
5.Align the timing mark of the crankshaft sprocket with the link plate (blue) to loop the
timing chain. Because the timing chain slacks, hold it to prevent the timing mark from coming off
the link plate.
|
|
6.Make sure that the timing mark of each sprocket is aligned with the link plate of the
timing chain at all of three locations.
7.Install the timing chain guide and tensioner lever.
|
|
1.Install the timing chain tensioner on the cylinder block and tighten it to the specified
torque of 11 ± 1 N·m.
2.Remove the hard wire (piano wire or the like) of Φ1.5 or hexagonal bar wrench
(1.5 mm) from the timing chain tensioner. This enables the plunger of the timing chain tensioner
to push the tensioner lever to keep the timing chain tight.
|
)

)
)
)
)
)
)
)
)
)
)
)