|
|
Remove the radiator condenser tank assembly mounting bolt, and move the radiator condenser
tank assembly to a place where it does not interfere with the alternator and others belt removal
and installation.
|
|
|
To introduce the serpentine drive system with the alternator drive belt auto-tensioner,
the following operations will be required.
|

|
1.
| caution |
To reuse the alternator and others belt, draw an arrow indicating
the rotating direction on the back of the alternator and others belt using chalk to install
the same direction.
|
| warning |
Always work from above when releasing the tension of the
auto-tensioner. When you try to gain access from underneath the vehicle, you will experience difficulty,
thus causing the tool to be dropped off.
|
| caution |
To work at the optimum angle, you must choose a most suitable
ring spanner is applied to the special tool belt tension release wrench (MB992278).
|
| warning |
Be sure to set the ring spanner and the special tool belt
tension release wrench (MB992278) to the hexagonal parts securely to prevent the tool from falling
off because the tension of the auto-tensioner is high.
|
Install special tool belt tension release wrench (MB992278) and a ring spanner at the
optimum angle.
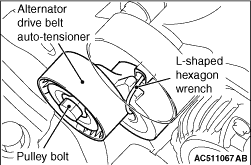
2.Rotate the pulley bolt of the auto-tensioner anti-clockwise.
3.Insert the L-shaped hexagon wrench into the auto-tensioner hole to fix the auto-tensioner.
4.Remove the drive belt.
|
|
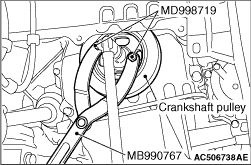
1.Use the following special tools to support the crankshaft pulley.
- Front hub and flange yoke holder (MB990767)
- Pin (MD998719)
2.Loosen the crankshaft pulley centre bolt and remove the crankshaft pulley washer and
crankshaft pulley.
|

|
1.Wipe off the dirt on the crankshaft sprocket, crankshaft and crankshaft pulley as shown
in the figure using a rag, and then degrease the areas.
| note |
Degrease them to prevent drop in the friction coefficient of the pressed area which is
caused by oil adhesion.
|
2.Install the crankshaft pulley.
3.Wipe off the dirt on the crankshaft pulley washer and the crankshaft pulley centre
bolt as shown in the figure using a rag.
4.Apply an adequate and minimum amount of engine oil to the thread
of the crankshaft pulley centre bolt and the lower area of the flange.
|
|
5.Use the following special tools as during removal to support the crankshaft pulley.
- Front hub and flange yoke holder (MB990767)
- Pin (MD998719)
6.Tighten the crankshaft pulley centre bolt to the specified torque.
Tightening torque: 210 N·m
|


|
1.
| caution |
- To reuse the alternator and others belt,
install it by aligning the arrow mark on the backside of belt marked at the removal with the
rotating direction.
- Check that the notches of the notched pulley and the notches of the alternator and others
belt are fit correctly.
- Check that the alternator and others belt is installed in the centre of the flat
surface of the flat pulley.
|
Install the alternator and others belt to each pulley as shown in the figure.
|
|
2.
| warning |
Always work from above when releasing the tension of
the auto-tensioner. When you try to gain access from underneath the vehicle, you will experience difficulty,
thus causing the tool to be dropped off.
|
| caution |
To work at the optimum angle, you must choose a most suitable
ring spanner is applied to the special tool belt tension release wrench (MB992278).
|
| warning |
Be sure to set the ring spanner and the special tool belt
tension release wrench (MB992278) to the hexagonal parts securely to prevent the tool from falling
off because the tension of the auto-tensioner is high.
|
Install special tool belt tension release wrench (MB992278) and a ring spanner at the
optimum angle.
3.Rotate the auto-tensioner anti-clockwise and remove the L-shaped hexagon wrench
fixing the auto-tensioner.
4.Apply tension to the alternator and others belt while slowly turning the alternator
drive belt auto-tensioner clockwise.
|
 ).
).)
)
)
)
)
)
)