|
|
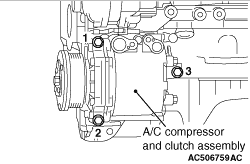
1.Remove the A/C compressor and clutch assembly together with the hose from the bracket.
|
|
|
2.Tie the removed A/C compressor and clutch assembly with a string at a position where they will not interfere with the removal and installation of engine oil pan.
|
|
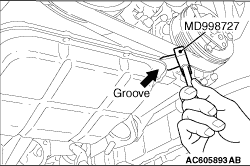
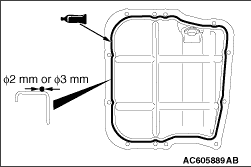
Insert special tool oil pan FIPG cutter (MD998727), into the groove shown in the illustration. Strike and slide it and then cut the liquid gasket.
|
|
|
1.Remove the engine upper oil pan mounting bolts.
|
|
2.
| caution |
Do not use special tool oil pan FIPG cutter (MD998727). The engine upper oil pan is made of aluminium and this tool will damage it.
|
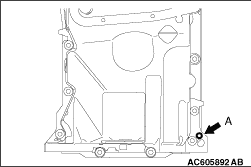
Screw in the bolt (M10 × 1.25) into bolt hole A in the location shown. Then lift the upper oil pan and remove it.
|
|
|
1.Remove sealant from the engine upper oil pan and cylinder block mating surfaces.
|
|
|
2.Degrease the sealant-coated surface and the engine upper oil pan mating surface.
|
|
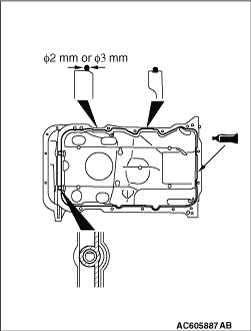
3.Apply a bead of the sealant to the cylinder block mating surface of the engine upper oil pan as shown.
Specified sealant: Three bond 1217G or equivalent
| note |
Install the engine upper oil pan immediately after applying sealant.
|
|
|
4.
| caution |
After the installation, until a sufficient period of time (one hour or more) elapses, do not apply the oil or water to the sealant application area or start the engine.
|
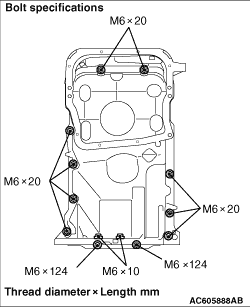
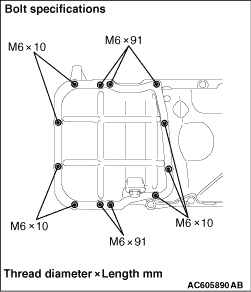
Install the mounting bolts to the engine upper oil pan and engine oil pan cover as shown, and tighten them to the specified torque.
Tightening torque: 9.5 ± 2.5 N·m
|
|
|
1.Remove sealant from the engine lower oil pan and engine upper oil pan.
|
|
|
2.Degrease the sealant-coated surface and the engine lower oil pan mating surface.
|
|
3.Apply a bead of the sealant to the mating surface of the engine lower oil pan as shown.
Specified sealant: Three bond 1217G or equivalent
| note |
Install the engine lower oil pan immediately after applying sealant.
|
|
|
4.
| caution |
After the installation, until a sufficient period of time (one hour or more) elapses, do not apply the oil or water to the sealant application area or start the engine.
|
Install the mounting bolts to the engine lower oil pan as shown, and tighten them to the specified torque.
Tightening torque: 9.5 ± 2.5 N·m
|
|
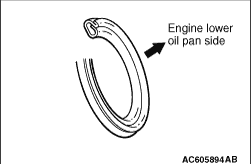
Replace the engine oil pan drain plug gasket with a new gasket. Install the new engine oil pan drain plug gasket in the direction shown in the illustration.
|
|
Tighten A/C compressor and clutch assembly mounting bolts to the specified torque in the order of number shown in the illustration.
Tightening torque: 23 ± 6 N·m
|
 ).
).)
)
)
)
)
)
)
)
)