|
| caution |
The tab of the mirror is prone to breakage when working in cold temperatures. Always use a hair drier or the like to warm up the mirror tab and its periphery to 20°C or higher prior to works. When the mirror is heated too quickly from its cold state, it may be broken.
|
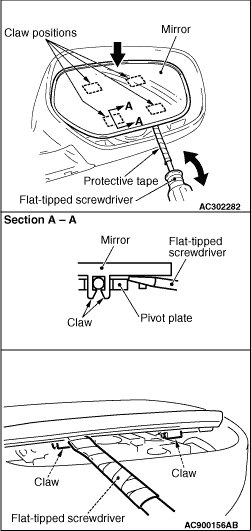
1.Slant the mirror upward with your hands. Then insert a flat-tipped screwdriver wrapped with protective tape between the pivot plate and mirror. Now pry off the mirror claws and release the lower side of the mirror as shown in the illustration.
2.Release the upper side of the mirror claws while pulling out the mirror.
3.Disconnect the connectors of the heated mirror.
|
|
1.Remove the mirror (Refer to the step A of the REMOVAL SERVICE POINTS).
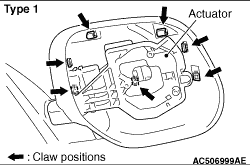
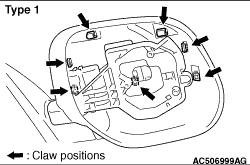
2.Remove the door mirror outer cover claws as shown in the figure and remove the outer cover from the door mirror housing.
| note |
If claw(s) are difficult to disengage, remove the actuator mounting screws to release the actuator and disengage the claws.
|
|
|
|
1.Remove the mirror (Refer to the step A of the REMOVAL SERVICE POINTS).
|
|
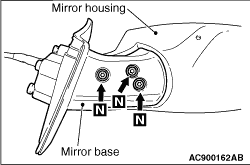
| caution |
When installing, always use new Torx screws.
|
2.Remove the 3 Torx screws connecting the mirror base and mirror housing.
|
|
3.Pull out the mirror housing from the mirror base; taking care not to damage the door mirror harness and connector.
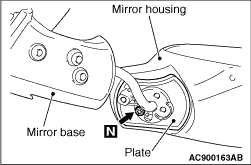
| caution |
When installing, always use new Torx screw.
|
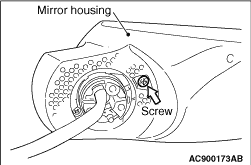
4.Remove the Torx screw connecting the plate and mirror housing.
|
|
5.Remove the screw connecting the mirror housing and actuator lower part.
|
|
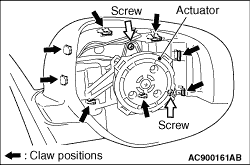
6.Remove the 2 screws connecting the actuator and mirror housing.
7.Slide the actuator and disengage the door mirror outer cover claws as shown in the figure. Remove the outer cover from the door mirror housing.
|

|
Install the door mirror outer cover by engaging the claws as shown in the figure.
|
)
)
 .)
.))
)
)
)
)
)
)
)
)
)