Trouble symptom
|
Cause
|
Item
|
The centre display cannot display possible cruising distance correctly.
|
The body type [Long (long wheelbase) or Short (short wheelbase)] that does not match the vehicle may be set in the centre display.
|
Body type setting (Set the correct body type).
|
"Audio com error" (communication error) is displayed on the centre display screen.
|
The audio unit or the centre display may be defective, or harness wires and connectors may be damaged (short circuit or open circuit).
This error is displayed when the audio unit cannot communicate with the centre display.
|
Do not set the model type. Check the wiring harness and connectors, and check the audio unit or the centre display. Then, repair if necessary.
|
The information that has been input may differ from the model type information set in the centre display.
|
Model type setting (Set the correct model type).
|
The compass azimuth display is still abnormal even after the declination calibration and the compass calibration in the compass setting are performed.
|
Something may be wrong with the azimuth display function itself.
|
Demagnetise the body (Demagnetise the body using a commercial demagnetiser. Refer to Vehicle magnetic compensation  ). ).
|
If the compass azimuth display is still abnormal even after the demagnetisation of the body, delete the compass azimuth circle (Reset the azimuth display function itself).
|
|
|
1.With the ignition switch at the "LOCK" (OFF) position, press the [ADJ] button.
|
|
|
2.With the [ADJ] button being pressed, turn the ignition switch to the "ACC" position, and hold that for five seconds or more.
|
|
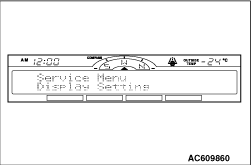
3.The service mode is started, and the "Service Menu" and "Display Setting" screens are displayed.
| note |
When the [ADJ] button is pressed on the "Display Setting" screen, the display is shifted to the body type setting ("BODY TYPE") screen. After that, each time when the [INFO] button is pressed, the display is shifted among the following three setting screens: model type setting ("FUNCTION TYPE") screen, compass azimuth circle delete ("PROF CIRCLE DEL") screen, and body type setting screen.
|
|
|
|
When any of the following operations is performed, the service mode is terminated.
|
|
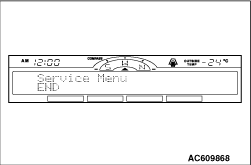
- Turn the ignition switch to the "LOCK" (OFF) position to terminate the service mode forcibly.
- Press the [INFO] button on the "Display Setting" screen to display the "END" screen. On the "END" screen, press the [ADJ] button to terminate the service mode.
| note |
To return to the "Display Setting" screen from each setting screen, press the [BACK] button.
|
|
|
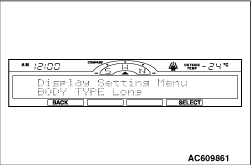
1.Press the [ADJ] button on the "Display Setting" screen.
|
|
2.The "BODY TYPE" screen is displayed, and the body type currently set is indicated.
| note |
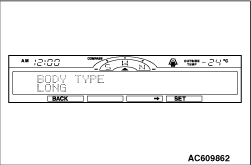
The set body type is indicated as "LONG" or "SHORT."
|
3.To change the body type, press the [SELECT] button.
|

|
4.When "LONG" is indicated, for the vehicle type with long body, press the [SET] button. For the vehicle type with short body, press [→] button. Check that "SHORT" is indicated, and press the [SET] button.
| note |
When the [←] button is pressed with "SHORT" being displayed, "LONG" is indicated.
|
|
|
5.When the screen returns to the "BODY TYPE" screen, check that the body type is set correctly, and terminate the service mode.
|
|
1.Press the [ADJ] button on the "Display Setting" screen.
|
|
2.When the "BODY TYPE" screen is displayed, press the [INFO] button.
|
|
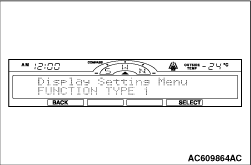
3.The "FUNCTION TYPE" screen is displayed, and the body type currently set is indicated. To reset the model type, press the [SELECT] button.
| note |
The model types are indicated by numbers from "1" to "6." They are classified as shown in the table below.
|
Model type
|
TYPE 1
|
TYPE 2
|
TYPE 3
|
TYPE 4
|
TYPE 5
|
TYPE 6
|
Information display function
|
Trip computer display
|
Average vehicle speed
|
×
|
-
|
×
|
-
|
×
|
-
|
Average fuel consumption
|
×
|
-
|
×
|
-
|
×
|
-
|
Possible cruising distance
|
×
|
-
|
×
|
-
|
×
|
-
|
Environmental data
|
Ambient temperature
|
×
|
×
|
×
|
×
|
×
|
×
|
Air pressure
|
×
|
×
|
×
|
×
|
×
|
×
|
Altitude
|
×
|
×
|
×
|
×
|
×
|
×
|
Compass
|
×
|
×
|
×
|
×
|
-
|
-
|
Clock
|
×
|
×
|
×
|
×
|
×
|
×
|
Calendar
|
×
|
×
|
×
|
×
|
×
|
×
|
Audio
|
×
|
×
|
-
|
-
|
-
|
-
|
Display OFF
|
×
|
×
|
×
|
×
|
×
|
×
|
User settings
(Clock, calendar, compass, unit, etc.)
|
×
|
×
|
×
|
×
|
×
|
×
|
Opening display (Mitsubishi logotype display)
|
×
|
×
|
×
|
×
|
-
|
-
|
Service Mode
|
×
|
×
|
×
|
×
|
×
|
×
|
Body type setting (SHORT or LONG)
|
×
|
×
|
×
|
×
|
×
|
×
|
Illumination
|
Screen brightness adjustment
(Adjusts the display individually)
|
×
|
×
|
×
|
×
|
×
|
×
|
Button illumination
(linked with rheostat only)
|
×
|
×
|
×
|
×
|
×
|
×
|
- ×: With function
- -: Without function
|

|
4.When "RESET OK?" is indicated, press the [SET] button.
|
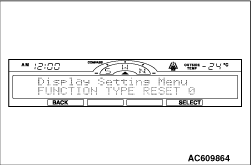
|
5.When the screen returns to the "FUNCTION TYPE" screen, check that "RESET 0" is indicated, and terminate the service mode.
6.Turn the ignition switch to the "LOCK" (OFF) position.
7.Turn the ignition switch from the LOCK (OFF) position to the ON position.
| note |
When the ignition switch is turned from "LOCK" to "ON" for the first time after the model type is reset, the centre display automatically judges the status of other ECUs to set the model type.
|
|
|
1.Press the [ADJ] button on the "Display Setting" screen.
|
|
2.When the "BODY TYPE" screen is displayed, press the [INFO] button.
|
|
3.When the "FUNCTION TYPE" screen is displayed, press the [INFO] button.
|
|
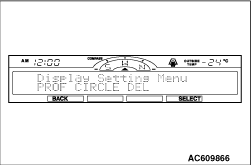
4.The "PROF CIRCLE DEL" screen is displayed. To delete the compass azimuth circle data, press the [SELECT] button.
|
|
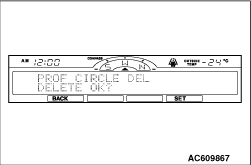
5.When "DELETE OK?" is indicated, press the [SET] button.
|
|
6.When the screen returns to the "PROF CIRCLE DEL" screen, terminate the service mode
|
)
)
)
)
)
)
)
)
)
)